.
.You can reassign all records from Sales Rep A to B. However, you may lose some past history associated with Sales Rep A. To replace a Rep by reassigning:
1) Set up the new territory.
· Go to System Console. Click on .
· Click on  for System Config.
· Click on Territories.
· Select the Branch that the territory is in.
· Click on edit next to the name of the existing territory that should be associated with the new Rep.
· Change the territory name and click on Save.
· Click on the home graphic to return to the System Console.
2) Set up a User ID for Sales Rep B.
· From the
System Console, click on  for User
Profiles.
for User
Profiles.
· Click on New.
· Fill out the form for the new profile.
· Click Save.
· Click on the home graphic to return to the System Console.
3) Add the Sales Rep Bs user name to the User Hierarchy.
· In the System
Console, click on  for User Hierarchy Maintenance.
· Select Sales Rep B in the Sales Rep Users list.
· Select the users supervisor in the Works for list.
· Click on Go.
· Click on the home graphic to return to the System Console.
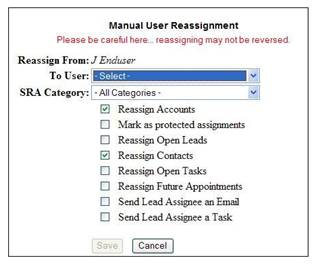
4) Reassign accounts, leads, unlinked contacts, tasks, and appointments from Sales Rep A to Sales Rep B. (Also see Reassigning From One Sales Rep to Another.)
· In the System
Console, click on for User Profiles. A
user list is displayed.
· Select Inactive in the search field and click Refresh. Sales Rep A should be in the list.
· Click on the ID of Sales Rep A. The profile opens.
· Click on Re-assign Accounts.
· In the To User field, select Sales Rep B.
· Select All Categories.
· Select
appropriate checkbox settings.
(Note: Accounts
that were protected for A will be protected for B with no checkmark in the
protected box. Since an email or task would be
created for each lead, it is recommended to leave the
last two boxes unchecked in this scenario.)
· Click on Save.